This document describes how to manage the voltage drops in a 4 to 20 mA current loop, and how to determine the proper power supply voltage for the loop.
4 to 20 mA Current Loop Overview
The 4 to 20 mA current loop is a very robust sensor signaling standard. Current loops are ideal for data transmission because of their inherent insensitivity to electrical noise. Designing 4 to 20 mA current loops is just managing the voltage drops around the loop. The voltage drops occur in the wire, the transmitter and load resistor.
Wire
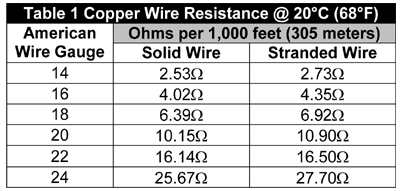
The voltage drop in wire is directly proportional to the current flowing through it by Ohms law, current x resistance equals voltage. Table 1 shows the resistance of common wire.
Transmitter
The transmitter consumes 7 to 15 VDC of loop voltage, depending on model, to power itself.
Load Resistor
Finally, the controller’s load resistor converts the loop current to a voltage for easy signal processing. Most commonly a 250-Ohm resistor is used to convert the loop current back to a voltage. At 4 mA, a 250Ω resistor drops 1 volt; at 12 mA, a 250-Ohm resistor drops 3 volts and at 20 mA, a 250-Ohm resistor drops 5 volts. The load resistor can be internal to the controller or external.
While ANSI/ISA-50.1-1982 (R1992) Compatibility of Analog Signal for Electronic Industrial Process Instruments says that the load resistor shall be 250Ω, resistor values of 50 to 1,000Ω may be used. To properly design a current loop you must know the value of the controller’s resistor.
2-Wire Transmitter with External Power & External Resistor
Many low cost HVAC/R controllers do not include a dedicated power supply or a factory configured input for a 4 to 20 mA signal. At the same time, many of the best sensors in the industry are only available as a 4 to 20 mA output. Figure 2 on the next page shows how to create a 4 to 20 mA current loop circuit for a controller without a dedicated power supply or an input for a 4 to 20 mA signal.
A 24 VAC transformer provides power to the controller and the BAPI VC350A current loop power supply (The primary high voltage wiring to the transformer is not shown). The VC350A should be mounted as close as possible to the controller. The positive output of the VC350A is connected through a cable to the Red or positive terminal of the transmitter. The Black or signal terminal of the transmitter is connected to the controller’s analog input. A load resistor is connected from the analog input to ground. If the controller’s analog input is configured for 0-5 VDC, then the load resistor should be 250Ω. The signal voltage will be 1 volt at 4 mA and 5 volts at 20 mA. If the controller’s analog input is configured for 0-10 VDC, then the load resistor should be 500Ω. The signal voltage will be 2 volt at 4 mA and 10 volts at 20 mA.

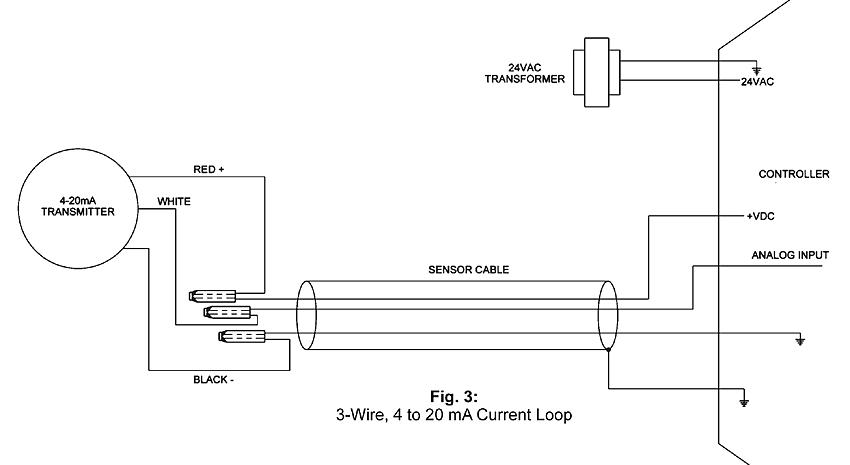
In the loop schematic above, a BAPI sensor is measuring the humidity of the outside air. The DDC controller is in the basement while the humidity sensor is on the roof. The two are connected by 1,600 feet of 22-gauge twisted pair wire.
The controller does not have a peripheral power supply or a dedicated 4 to 20 mA input. An external power supply and load resistor are therefore necessary. The 4 to 20 mA transmitter is the BAPI sensor referenced above while the current loop power supply is a BAPI VC350A voltage converter set to 24 VDC.
Wire Resistance
1,600 feet of 22-gauge twisted pair wire is actually 3,200 feet long – 1,600 feet out and 1,600 feet back. The resistance chart on the previous page shows that copper wire has a resistance of 16.14Ω per 1,000 feet at 20°C. Therefore the resistance of the 3,200 feet of wire at 20°C is:
3,200 ft x 16.14 Ω/1,000 ft = 51.65Ω.
The wire is run in equipment shafts that are not air-conditioned. The equipment shafts never fall below 32°F (0°C) but they may get as hot as 140°F (60°C) in the summer. The Temperature Coefficient of Copper is +0.393 percent per degree C. This means if the temperature increases 1°C, the resistance will increase 0.393%. The wire in the schematic above has a total resistance of 51.65Ω at 20°C, therefore the increase in resistance at 60°C would equal:
(60°C-20°C) x 0.00393 per °C x 51.65Ω = 8.12Ω
Adding this increase to the original resistance equals:
8.12Ω + 51.65Ω = 59.77Ω
The resistance of the 3,200 feet of wire at 140°F increased by 16% from 51.65Ω to 59.77Ω.
Voltage Drops Around the Loop
To properly design a 4 to 20 mA current loop, the voltage drops around the loop need to be calculated at the maximum resistance and maximum signal current of 20 mA, and calculated again at the minimum resistance and minimum signal current of 4 mA.
The maximum resistance of the wire (60°C) is 59.77Ω. Multiply this by the maximum signal current of 20 mA and the voltage drop of the wire equals:
59.77Ω x 0.02A = 1.195 volts
The BAPI humidity transmitter drops a minimum of 15 volts, while the 250Ω controller resistor drops 5 volts at 20 mA. Adding all the voltage drops together equals:
1.195 + 15 + 5 = 21.195 volts
The power supply is set to 24 volts. Where did the extra 2.805 volts go? It’s dropped across the transmitter. All the voltage that isn’t dropped across the wires or the controller resistor is dropped across the transmitter itself. Therefore, at a maximum signal current of 20 mA, the total drop across the transmitter is 17.802 volts (24 volts – 1.195 volts – 5 volts = 17.802 volts). Having the transmitter drop a couple of extra volts above its minimum rating (15 volts) is just good engineering practice. It protects the integrity of the current loop as the connections oxidize and age.
The voltage drops must also be calculated at the minimum resistance and minimum signal current of 4 mA to be sure that the transmitter is not being asked to drop more voltage than its maximum rating.
The equipment shafts where the copper wire is run may get as low as 0°C. The Temperature Coefficient of Copper is +0.393 percent per degree C, therefore a drop of 1°C will decrease the resistance by 0.393%. The wire in the schematic of Figure 2 has a total resistance of 51.65Ω at 20°C, therefore the decrease in resistance at 0°C would equal:
(0°C-20°C) x 0.00393 per °C x 51.65Ω = -4.06Ω
Subtracting this from the original resistance equals;
51.65Ω – 4.06Ω = 47.59Ω
The minimum resistance of the wire (0°C) is 47.59Ω. Multiply this by the minimum signal current of 4 mA and the voltage drop of the wire equals:
47.59Ω x 0.004A = 0.19 volts
The BAPI humidity transmitter drops a minimum of 15 volts, while the 250 Ω controller resistor drops 1 volts at 4 mA. Adding all the voltage drops together equals:
0.19 + 15 + 1 = 16.19 volts
With the power supply set to 24 volts, the transmitter drops 22.81 volts (24 volts – 0.19 volts – 1 volt = 22.81 volts). The BAPI humidity transmitter has a maximum voltage drop rating of 24 volts. Therefore the voltage dropped across the transmitter is close to its maximum specification, but still within tolerance at the minimum resistance and minimum signal current.
Some Programmable Logic Controllers have power supplies of up to 36VDC, allowing really long current loops. A 36VDC supply in the above example would create a voltage drop across the transmitter which is above its maximum rating. The only way to use the 36VDC supply would be to put a resistor or two into the loop to eat up the extra voltage. Just be sure not to go overboard on the low end, or you will not be able to reach the 20 mA signaling point. A 50Ω resistor will drop 1 volt at 20 mA and 0.2 volts at 4 mA.
3-Wire Transmitter Current Loop
Some of BAPI’s current transmitters are three-wire devices, rather than two-wire devices. A three-wire transmitter is significantly different from a two-wire transmitter. A three-wire transmitter will consume more current from the system power supply than the 20 mA signaling current because the transmitter itself requires some current to operate.
In the loop schematic above, a BAPI-Stat room sensor is meauring the temperature of a room. The BAPI-Stat itself requires 10 mA of current to operate. Therefore when the signal current (the white wire) is at 4 mA, the total current from the power supply is 14 mA. When the signal current is at 20 mA, the total current from the power supply is 30 mA.
Calculating the voltage drops for this three-wire transmitter loop is different than with a two-wire loop. In the three-wire loop, the power supply positive (+) wire has the total current flowing through it while the 4 to 20 mA signal wire has only the signaling current flowing in it. Therefore, there are two one-way voltage drops to calculate; one is the power supply line voltage drop and the second is the signaling line voltage drop. Because there are different currents in each wire, the voltage drops are determined separately and then added together.
Since BAPI-Stats measure occupied spaces, it is not necessary to calculate wiring resistance due to large temperature swings. Using the 20°C (68°F) resistance is all that’s necessary. If the BAPI-Stat is 250 feet from the controller utilizing 22 gauge wire, and the signal current is at 20 mA, the voltage drop from the power supply wire to the BAPI-Stat is:
16.14Ω x (250Ft/1000Ft) x 30mA = 0.12 volts
The voltage drop on the signal wire at 20 mA is:
16.14Ω x (250Ft/1000Ft) x 20mA = 0.08 volts
The 250-Ohm receiver resistor drops 5 volts at 20 mA and the BAPI-Stat’s minimum voltage is 15 VDC, so the voltage around the loop is:
0.12 + 0.08 + 5 + 15 = 20.2 VDC
Any system power supply of greater than 20.2 VDC will allow full signaling.
Since the voltage on the power pin of a 3-wire transmitter is essentially constant and is not affected by the signal current level, you do not have to calculate the voltage drops at a signal current of 4 mA. As long as the voltage of the power supply is greater than the voltage drops around the loop at 20 mA signal current, and below the maximum voltage rating of the transmitter itself, then the power supply voltage is designed correctly.
3-Wire Transmitter with Two Independent 4 to 20 mA Signals
The BAPI-Stat is also capable of supplying two independent 4 to 20 mA signals. Calculating the voltage drops and properly sizing the power supply in this case is very similar to the previous example. The BAPI-Stat itself requires 10 mA of current to operate. Therefore, when each signal is at 4 mA output, the BAPI-Stat consumes 18 mA from the system power supply. When each signal is at 20 mA output, the BAPI-Stat consumes 50 mA from the system power supply.
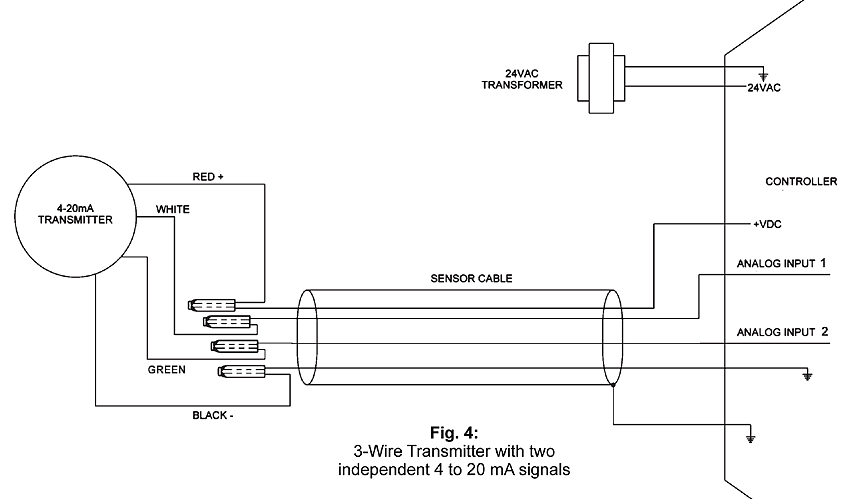
In the example above, the power supply positive (+) wire has the total current flowing through it while the 4 to 20 mA signal wires have only the signaling current flowing them. As in the previous example, there are two one-way voltage drops to calculate; one is the power supply wire voltage drop and the second is the signaling wire voltage drop. Because there are different currents in each wire, the voltage drops are determined separately and then added together.
If the BAPI-Stat is 250 feet from the controller utilizing 22 gauge wire, and both signal current are at 20 mA, the voltage drop from the power supply wire to the BAPI-Stat is:
16.14Ω x (250Ft/1000Ft) x 50mA = 0.20 volts
The voltage drop due to one channel’s 20 mA signal current is:
16.14Ω x (250Ft/1000Ft) x 20mA = 0.08 volts
The second signal channel is in parallel with the first channel, so it does not need to be added to the voltage drops around the loop. The 250-Ohm receiver resistor drops 5 volts at 20 mA and the BAPI-Stat’s minimum voltage is 15 VDC, so the voltage around the loop is:
0.20 + 0.08 + 5 + 15 = 20.28 VDC
Any system power supply of greater than 22.28 VDC will allow full signaling.
Since the voltage on the power pin of a 3-wire transmitter is essentially constant and is not affected by the signal current levels, you do not have to calculate the voltage drops at a signal current of 4 mA. As long as the voltage of the power supply is greater than the voltage drops around the loop at 20 mA signal currents, and below the maximum voltage rating of the transmitter itself, then the power supply voltage is designed correctly.
If you would like more information about 4 to 20 mA current loops, call your BAPI representative or see the BAPI Application Notes: 4 to 20 mA Current Loop Configurations or Designing 4 to 20 mA Current Loops on this website.
Reference
ANSI/ISA-50.1-1982 (R1992) Compatibility of Analog Signal for Electronic Industrial Process Instruments. (This document is the industry specification for 4 to 20mA current loop signaling.)